Gasifier (microgasification)

Otto Formo, January 2010

Clean burning PekoPe 2009Clean burning PekoPe 2009

The Peko Pe is an easy to built, top lit, natural draft (no fan) gasifying stove that burns biomass completely (low to no ash or char). It is

  • Efficient: easy to light, easy to handle, cooks quickly at high temperature.
  • Complete combustion no smoke and no soot
  • Flexible Covering all needs of energy for all types of household and institutional kitchen and other activities like take away food, bakery etc.
  • Simple Not intimidating technology.

The Peko Pe

The Energy Unit, single also called Peko Pe is designed to cover the general basic need for energy, but can be manufactured both smaller and bigger.

The combustion chamber is the heart of the system, and from there the heat will be consentrated up under the pot. The Energy Unit can be used both for cooking and for heating. Single, as a cooking or heating stove, it will cover the basic needs of energy for smaller household. More units put together will cover the need of energy for bigger houshold, institutional kitchen and pots of any size.

Boiling water Boiling water

Boiling testBoiling test

The fuel
Any kind of dry combustible biomass can be used as fuel.

The fire has complete combustion; is High temperature. No smoke. No soot. Some tar under the pan. Sensitive to wind

The usage
It is New technology and requires some training, but it is Easy to use; Flexible; Fits all types of kitchen utensils; and transmits No heat to the sides.

For more information, take a look at the Peko Pe web site: http://www.pekope.net/stove.html
and also the Miomio site: http://www.miombo.no/

Nathaniel Mulcahy, January 2010

Attached are the photos of Mr. Ronald Watts' version of our EverythingNice Stove. A version of which we are now rushing for the Haitian relief efforts to provide clean water. More later

yours, Nat

--
Dear Nathaniel

Here a a few photos from the successful construction and operation of the stove. Because I had no suitable vessels, I built them from sheet steel. It operates quite well, and is a good prototype for a larger model

Many thanks
Ronald Watts

Bjarne Laustsen, January 2010, update November, 2010

Jiko Mbono is Swahili for Jatropha Stove.

This is an early version of the stove, it is now using That stove was an early prototype. It is no longer using whole seeds but instead pellets made from the pulp left over after the pressing of jatropha oil, although there is only one pelletization facility for this in Tanzania and no distribution arrangements. Now only, the Jiko Safi uses whole seeds.
The idea is to plant jatropha as a hedge around land holdings. Animals won’t eat it and around an average holding it produces enough seed for a family’s annual fuel needs. I agree that planting it as a crop isn’t ideal

*****

Jiko Mbono was developed for burning whole Jatropha seeds.
The stove is a TLUD (Top-Lit UpDraft) gasification stove with natural draft air supply.

Earlier development of Jatropha stoves have mainly been based on the use of Jatropha oil. But the use of Jatropha oil in stoves have had some problems. In wick stoves the problem have been on the high viscosity of the oil which makes it difficult to climb wick to feed the flame, this has caused the wick material to burn. Jatropha pressurised stoves have also the problems of keeping the nozzles clean, and also the complicated design which tends to make the stoves relative expensive.

I therefore got the idea to burn the seeds directly in the stove. If the gasification process could provide the heat in the stove to vaporize out the oil from the seeds in the form of gasses, that will save us the work of first mechanically pressing the oil out of the seeds.

I therefore started some experimentation with some simple stove design, and these first experiments showed that it was possible to burn the whole seeds in a stove. Further developments was however needed to get an efficient and user friendly design of the stove.

I contacted Dr. Hassan M. Rajabu from College of Engineering & Technology at University of Dar es Salaam so that we could further develop the stove and test the stove after each modification. In this development we have received valuable economical support from the US based organisation Partners for Development and also support from Pamoja INC. Engineer F. Lauwo from Tanzania Engineering and Manufacturing Design Organisation (TEMDO) have provided assistance in producing the prototypes of the stoves.


Diagram of Jiko Mbono.

The fire in the stove is normally started by having a few crushed seeds that are soaked in methylated spirit or kerosene. These crushed seeds are placed at the top of other seeds in the fuelbox and the fire is lit in these crushed seeds.
The initial process can be started inside the stove or outside. When some seeds at the top got good flames (3-5 minutes) the fuelbox is then placed on the shelve at the bottom of the stove door and the door is closed so the fuelbox get into its position in the centre of the stove. In this initial phase the primary air is kept fully open.

The pyrolysis of the seeds by supply of primary air will gradually build up and the gasses from the pyrolysis will raise by the draft from the stoves internal chimney and be burned at the top by mixing with the secondary air.

During this gradually build up of heat the primary air supply need to be reduced such that enough secondary air can be supplied to allow for a good combustion of the gasses.

The burning of the Jatropha seeds is undertaken in batch portions. After all the seeds in the fuelbox have been pyrolysis the fuelbox need to be taken out and refilled for a new burning. It is not possible at this stage of the development of the stove to refill the fuelbox when the stove is operating, such refilling will just results in heavy smoke.

With a full load of fuel 300 – 400 gram of Jatropha seeds the stove can burn for 1 to 1½ hour when used in real cooking where the fire is somehow turned down. During test we have recorded specific fuel consumption on around 52 gram seeds per liter of boiling water, and an energy efficiency around 44%. However, the high efficiency is atributed to the design of the top part of the stove where the top is inserted in a skirt.

When operated properly the carbon in the seeds will remain as some kind of charcoal.

The use of renewable fuel is important here in Tanzania, where most of the biomass fuels are harvested in natural forests which takes year to re-grow.
We have estimated that a household having 200 – 300 meters of hedges of Jatropha trees will be able to meet their own need of fuel for the household cooking. Jatropha is often planted as hedges, it is a good hedge plant, as it is not browsed by goats, cows or other animals. Also as a hedge plant it does not compete with food crops on cultivating areas.

For urban households in Tanzania Jatropha is a viable alternative to charcoal. A farmer here gets 150 Tsh for one kg of Jatropha seeds (exchange rate 1350 to $). In town the Jatropha seeds will sell for around 300 sh. An urban household will need around 2 kg seeds per day to meet their energy need for cooking, that gives a monthly energy bill of 18,000 sh. If the same households are using charcoal it will on average consume 3 bags of 30 kg charcoal of a price of not less than 15,000 sh, this gives a monthly energy bill of minimum 45,000 sh. The use of Jatropha will in this way represent a good saving and alternative to fuelwood and charcoal.

Other seeds and crop wates can also be used in the stove. We know that seeds from the Croton tree burns well so does Castor seeds. We have also tried and found that the shells from cashew nut burn well in the stove. These shells are mainly a waste product from small-scale Cashew nut processing plants which are scattered in regions growing cashew trees.. We also believe that other seeds such as the oil palm kernel could also burn well when cracked a little. There will likely be many other oil holding seeds that could be used in such a stove.

This is a three-part brief description of the World Stove Everything Nice stove made by Al Hislop and Patty Roberts, with Ron Larson participating in the first tests, January, 2010.

World Everything Nice StoveWorld Everything Nice Stove
Plans Available at: http://worldstove.com/wp-content/uploads/2009/11/EverythingNice_Stove_Instructions.pdf

Part A. Narrative (by Patty)

Biochar Experiment 1 1/9/10

Al made an Everything Nice pyrolyzer from the design on the World Stove website. We used a large coffee can and then a canister for the two cans so it was rather large. We first tried pine cones but they just smoked so we put in pellets instead. This gave a good clean burn and we put a tripod over the stove and boiled water, heated soup, cooked pasta and cooked pasta sauce with fresh meat and fresh vegetables. When the flame extinguished, there was still some smoke coming from the stove so it was covered on the top to remove oxygen and set in a shallow basin of water on the bottom. This extinguished the smoke but moistened the bottom of the char slightly. When we emptied the stove, we saw that some of the pellets had not pyrolyzed. We believe this was because of the fairly large diameter of the can. To dry the char and pyrolyze the remaining pellets, we put the mass into a canister and put it into our hot wood stove. This allowed complete pyrolysis of the remaining pellets and provided complete drying of the fuel. It’s possible that this changed the pH of the char from its original pH because of a different pyrolysis temperature.

Ignition: torch (for several minutes)

Pre-burn Fuel Weight: 58.5 oz wood pellets from 100% pine, less than 1% ash

Post-burn Fuel Weight (Char): 16.5 oz (28.2% of starting weight)

Post-burn Fuel Volume: Slightly greater than half of pre-burn volume

Time: 2 hours and 20 minutes of a very good, clean, strong burn.

Calculated output to pot: 560 watts
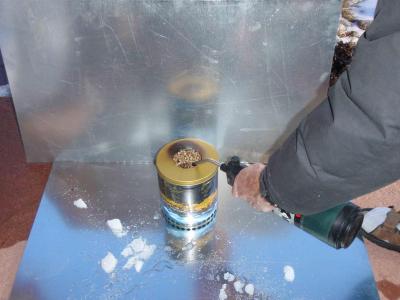

Exp1: (Saturday)
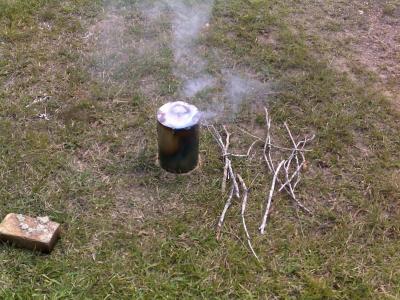
_*Lighting:*_ See text. Hope others can tell us of their successful
ways to light this same stove. We have not yet tried to solve this
problem using prepared starter materials. Maybe easier with the
"restriction-lid" removed? The two sheet metal wind-breaks and the ice
show this was not the best day for testing. Note the small amount of
discoloration (burned paint on the lid) - from an earlier test with
too-loose material (that was easier to light), which only gets a little
larger in later photos.. Discoloration off-centered because of windy
conditions and means of lighting. When we got it started with this
torch, there was never any massive smoking.

Experiment 1, Good FlameExperiment 1, Good Flame

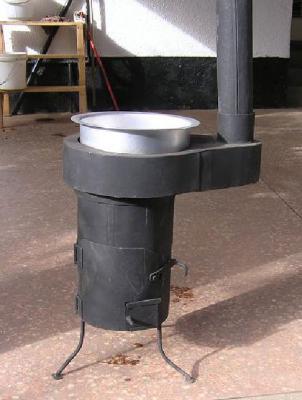
*_Good flame_*. A typical flame without a cook-pot. We saw essentially
the same flame for a total of more than 4 hours over two experiments.
The gap-reducing bricks not in place in this early photo. The
discoloration of the lid never got much more pronounced than here -
showing that a relatively cool gas is coming up in the outer narrow
"chimney". You can't see it here - but there are hot gases going down
through the central can fuel supply - doing the pyrolysis without
oxygen. We are unsure whether any pyrolysis gas is coming upwards
(we don't understand the pressure profiles yet), but certainly a good bit
is going downward. This is the best view of the outer set of large
holes. Could they be done with a punch? Maybe. Could they be
placed on the bottom of the outer can? Maybe - with a spacer
between the bottom surfaces of the two “cans” (as is done in the
mainWorld Stove models). There are several ways
possible to control this air supply - which should NOT be called the
primary air, as would be appropriate if this were a TLUD. Although
there is some pre-mixing of the combustion gases, this still is showing
signs of being a ("wispy") diffusion flame - not at all like the tighter
much bluer flame seen in Nathaniel's numerous YouTube videos and
mentioned in the instructions.

Experiment 1, CookingExperiment 1, Cooking
*_Cooking_*: Typical flame with a typical pot (and larger ones used for
some of the cooking). The tripod was in no way optimized (we raised
the stove about three inches with standard available mini-bricks; four
inches might have given higher efficiency - but more soot). It was
certainly easy to have too much heat for cooking pasta (boil-over once
when we weren't paying attention). At no time during the two hours of
operation did we (or could we) adjust anything. We are working on a
possible fix for that, when on a later weekend, we will try a means of
controlling the air flow. You should also next see a "convection skirt"
of the type being sold by Aprovecho.

Biochar Experiment 2 1/10/10

Using the same stove as yesterday, but this time with a cone in the center to displace the area that didn’t pyrolyze yesterday, we filled the stove with pellets again. This time however the stove had 15% less fuel because of the cone. We spent about a half hour trying to light the stove with twigs, vasoline, pine needles, paper, some other fluffy combustibles and fondue fuel. None of these things got the stove going. We ended up using the torch again. The torch lit the pellets in a minute or so and then it took about 15 minutes before we saw the good, steady, smokeless cooking flame. Once we got that good flame, we measured 2 hours 23 minutes of pyrolysis. The stove burned for the about the same amount of time as yesterday, but this time all the pellets were pyrolyzed. The outer can seemed to have the same temperature pattern today as yesterday.

Ignition: torch (shorter time than yesterday)
Pre-burn Fuel Weight: 49.5 oz wood pellets (same kind as yesterday)

Post-burn Fuel Weight (Char): 14 oz (28.2 % of starting weight, same as yesterday)

Post-burn volume: a little less than half

Calculated output to pot: 287 watts (This number is much lower than yesterday’s. We don’t like our thermometer for this application, so both days’ numbers are suspect.)

Time: 2 hours 23 (more carefully measured than yesterday)

Those temperatures were pretty consistent until the pyrolysis ended and we put a cap on the top. Unlike yesterday, we didn’t put the bottom in water. Smoke began to come out of the holes at the bottom and the temperature at the bottom began to rise. We suspected that some combustion was starting to take place. We poured the pellets into a tray but they seemed to be getting hotter rather than cooler so we scooped them into another canister and put on a tight lid so no more oxygen would be available.

Experiment 2, ConeExperiment 2, Cone

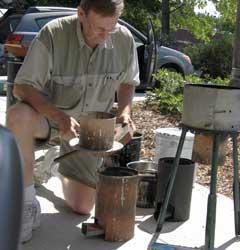
_*Cone*_ - Showing the cone and the interior (the latter after almost
five hours of operation). No signs of any excess heat anywhere on the
outside can. Little on the inner can, but considerable tarring on the
inside and the top portion of the cone. Probably a lot of interesting
pyrolysis science in understanding why the cone looks like it does after
2+ hours of operation one time. Note the many interior small holes.
Note the single screw holding the two cans together (not shown in Nathaniel's drawings [at http://worldstove.com/wp-content/uploads/2009/11/EverythingNice_Stove_In...
] but mentioned at the bottom of p 3. We found all the instructions
complete, but guess we have to test a lot more fuel combinations before
we get the tight blue flame mentioned in the instructions.

Experiment 2, After PyrolysisExperiment 2, After Pyrolysis
Exp 2 (Sunday)
*_After Pyrolisis_* A view into the unit perhaps ten-fifteen minutes after the
unit stopped operating - and began smoking (pretty profusely, so you
want to react quickly). We placed a second lid to cover the opening -
but nothing else.(no covering of the lower holes - which we would likely
try to do next time). Note good uniformity of the char except right in
the middle where you can see the tip of the added cone. This is the first
time you can see that there are two cans - with the spacing of about a
centimeter (exact spacing dictated by can availability; this outer can is available at
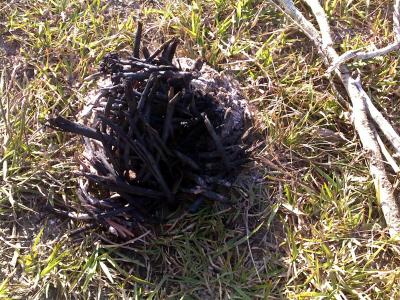
about $.50-$1.00; no cost for the inner can). At the lower left is the
(pre-trimmed) pine cone which charred perfectly after being placed into
the unit.. No lighting up, no combustion, perfect retention of tiny
features - proving the lack of oxygen just below the flames seen in
other pictures. The unit was initially filled up to within 3/4 inch of
the top of the inner can, per Nathaniel's instructions, so you can see
there was perhaps 35-40% shrinkage.

Experiment 2, CharExperiment 2, Char
_*Exp 2 Char:*_ This to show the good uniformity of the resulting
char. Just a few that looked torrified (deep brown color - but we
can't even see them in this photo), not charred. In Experiment #1,
with no interior cone, perhaps 15% uncharred, roughly in the volume
taken up by the cone.

New plans and new ideas: We want a sliding band around the bottom of the can which can be used to regulate airflow through the holes and maybe the pyrolysis rate. When the band slides down, it will partially close the holes. When pyrolisis has finished, the band can be pushed all the way down to cover the holes entirely and keep oxygen out.

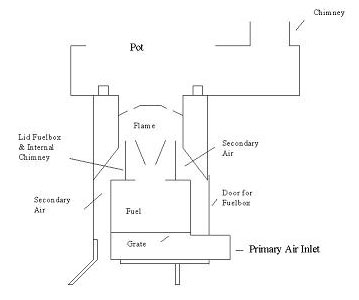
Part B. Technical Description

(by Al)

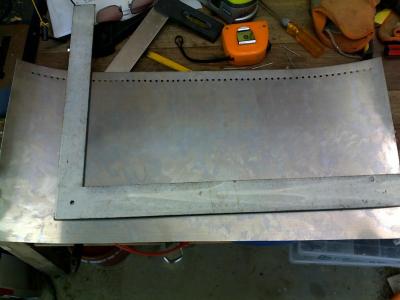
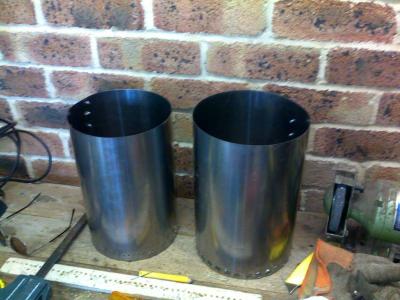
The inner tin was a Yuban Coffee can, with diameter 6.05 inches (excluding the roll bead where the bottom is attached. The original height of the can was 7.5 inches, and the height was trimmed down to 6.7 inches above the inside of the bottom surface. 74 holes .0.159 inch diameter were drilled on a line 0.75 inches from the bottom.

The outer tin was a decorative cookie tin with a fitted lid. The diameter of the can (excluding the rolled bead that attached the bottom) was 6.4 inches. A 3 inch diameter hole was cut in the center of the lid. The lid was 7.1 inches above the inside of the bottom of the can. 33 holes of 0.5 inch diameter were drilled as close as possible to the bottom of the outer can.

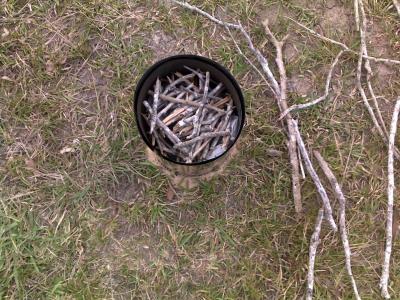
The inner can was filled to about ¾ inch of its top with pine pellets intended for use with pellet stoves. The weight of the fuel was 58.5 oz (1.66 kg). These pellets were ignited using a propane torch over the entire top surface for about 1 minute.

The stove operated with what appeared to be constant output for 140 minutes. A water heating test was performed with a pot set about 3 inches above the stove opening. Two liters of water was placed in a covered pot of diameter 8.5 inches and height (without lid) of 3 inches. Water temperature was measured using a “point-and-shoot” infrared thermometer. (I suspect that at higher temperatures this thermometer reads low, as it most likely senses the temperature of the steam above the water in the pot, and not the water itself.) Water start temperature was 12.5C, and finish temperature was 81.1C, at which time boiling bubbles were coming off the bottom of the pot, and much energy was being lost to steam. Elapsed time was 17 minutes.

When the flame extinguished, much smoke came from the stove, so a lid without a hole was placed on top of the stove. Smoke continued to pour from the holes at the bottom of the stove, so it was placed in a pan of water to cover the holes. This resulted in wetting of the contents of the stove. After cooling, the stove was opened and the contents examined. The fuel was found to have been converted to char, except for a portion of pellets about 1.5 inches high and 3 inches in diameter at the bottom of the stove.

Since the fuel was wet, it was not weighed. Instead, the wet fuel including the unconverted pellets was placed in a container and heated to complete pyrolization. The weight of the remaining char was 16.5 oz (28.2% original weight).

A hollow metal cone of height 4.5 inches and diameter 4.5 inches was made, and placed in the bottom of the inner can before adding fuel pellets for a second run. This time the weight of the fuel was 49.5 oz, the burn time was again 140 minutes, and the weight of the remaining char was 14 oz (28.3% original weight). This time all but 1 or 2 pellets appeared to have been converted to char.

Using a TLUD for Pasteurization at the Paramount Dairy in Uganda
John and Charles Anglin, Uganda, October 19, 2009
Pasteurization of 450Lts Milk Complete after 1.5hrs

John and Charles Anglin have built an institutional / industrial size TLUD for pasteurization at their Paramount Dairy in Uganda. Their 2-page report with 4 photos describes and shows the TLUD and the 450 liter milk-vat. The fuel is papyrus reeds. This report is about a "work-in-progress," and they have given permission to post it to the Stoves Website. The Anglin's can be reached via the Stoves Listserv.

Courtesy of Paul Anderson

Michael N Trevor
Marshall Islands

Marshall Islands TLUD

I finally got to lite it up. Again as some of you know my interests are
varied and doubled up. I want to burn what people may be throwing away or
burning to add to green house gases and global warming. I am also interested
in Char and Terra Preta as well as atoll soils are regarded a notoriously
weak. For those not in the tropics my fuel here are chopped up pieces of
the mid ribs from coconut palms. These do take some time to gather dry and
chop but some place these are nearly ubiquitous as rice hulls or sugar cane
scraps and their price may be right for many $0.00.

Fuel
Fuel

Loading Fuel
Loading Fuel

and AGainand Again
Trying to Lite Off
Trying to Lite Off

now its goingnow its going

Over all the stove owes serious thanks to Paul Anderson, who kept after me
to make it, and Paal Wendelbo and Sai Bhasker. They all contributed ideas
for me to digest. To some I have joked this hydrid should be called the
Champion Pekope Smokeburner. I like the simplicity of Paals and Pauls
secondary air gap. I like Sai's idea of fins to promote swirling and
mixing. I worry a little about Pauls protruding handles so I changed that a
little. Paul uses a riser to promote draft so I kept that and put Sai's
twister fins inside it. .

Lighting it off was not so easy and took three attempts, and much more smoke
that I would have liked. The stem pieces were not catching fire well. I
finally got it going with some copra chips and small pieces of frond riblets
as well, with a dash of WD 40. Once it finally caught in about the 6th photo
the flames do appear to be curling around in the riser can, and in the 7th
the standing flame has a nice twisty shape. The burn was not as long as I
had hoped for as by say 35 minutes it was definitely dying down. The fuel
was quite chunky and not very tightly packed, probalby why. There also was
char material left in the bottom but I should have pulled the burner can a
few minutes earlier.

The reuseable mesh disk in the bottom of the burner, a tin can, and the
simple handles needing 4 small nuts bolts and washers is not very
technically advanced, meaning making multiple standby drop in burners is
"from the dump" cheap. The way I have suspended the burner by its handles in
notches in the outer cylinder is a step towards further simplicity and means
changing in and out additional fuel canisters is very simple. (Please though
not one make jokes about the sloppy mis-sized handles) A craftsman would
have each canister identical. The principle should be clear to all though.
Paal was much the source for the straight simple outer cylinder but the
hanging basket burner means no spacers or legs and only simple holes for air
entrance. I do see some areas for further testing here...the gap between the
inner and outer housing and the number and size of air holes allong the
bottom of the outer cylinder. I have never seen Rajan's stoves but a SS
outer cylinder for appearance, a cooler shell and longevity with a drop in
sacrificial burner might be worth considering.

Since Paul brought up longivity in TLUDS this morning, I do hope that my
aluminum outer cylinder will not get hot enough to have a problem. The
tincan liner simply means drink some more milk and make another one, not big
deal at all. It may not be a Stradavarus, really more of a washtub bass,
but now I can play with the tuning it and my fuels. The main thing is it did
work sort of and I believe a couple of my ideas have merit. Anyone out
there in the larger world who sees a use for any of this please help
yourselves. Also please pass along any suggestions. It is interesting the
the Legislature and hearing got in to fuels, solar and sustainable issues
today.

If Tom does not think this is to simplistic he might want to clean it up and
post it.

From the sand box in the Pacific,

Michael N Trevor..

Marshall Islands TLUDMarshall Islands TLUD

Paul Anderson, 2009 SeaChar Stoves Workshop

The efforts at SeaChar (Seattle Biochar Initiative) produced a 5-gallon (22-liter) TLUD.

"On Saturday, August 1, Seachar hosted Dr. Paul Anderson (Dr. TLUD) for an all-day workshop in the construction of Top-Lit Up Draft (TLUD) cookstoves. The stoves can quickly be constructed from commonly available materials, and produce charcoal while providing heat for cooking (or other uses). Paul’s TLUD stoves have been tested and shown to produce very low emissions of CO and particulates. The stoves can provide benefits wherever people rely on biomass for cooking. TLUD stoves use a wide variety of small pieces of biomass for fuel. The clean burn greatly improves indoor air quality compared with open burning and many other types of stoves. In addition, the charcoal can be used as biochar to improve soil fertility, sequester carbon, and potentially provide a source of income through carbon credits."

For More See: http://seachar.org/wordpress/?p=176

The focus was for making biochar, but this size of TLUD will be highly appropriate of institutional-size cookstoves in the developing countries.

File attachments: 

Project Title: Western Gasifier Stove Project
African Christians Organization Net work, Salim Mayeki Shaban, May 10, 2009

AFCON WorkshopAFCON Workshop

APPLICANT

Name of Organization: African Christians Organization Net work
Mailing Address: P.O.BOX 323, BUNGOMA 50200 Kenya
Physical Address: 1 st fl. KCB Building
Telephone: + 254 727 621841
Email: salimshaban2005 at gmail.com
Principal Officer: Salim Mayeki Shaban
Project Contact Person: Salim Mayeki Shaban Programme Coordinator and Everlyne Otunga Program Manager

PROJECT
Focal Area: Reducing indoor air Pollution and forest Conservation
Activity Category: Learning by Doing Project.

Proposed project Duration: Two Years.

FINANCES
Total Mount grants Request: (KSHS) 4,245,429.20 (USD) 62,241.3
Other Contributions (KSHS) 1,520,000.00
Grand Total (KSHS) 5,765,429.20
Exchange Rate kshs 70.00 = I Us$

1.0 EXECUTIVE SUMMARY

1.1 GOAL OF THE PROJECT
To promote energy conservation and reduce deforestation in the sugar cane growing in Western Kenya.

.1.2.1 Specific Objectives
To Promote TLUD gasifier cookstoves and five biogas planter in Western Kenya
To provide and service 20,000 TLUD gasifier cookstoves and 5,000 fireless stoves..
To train 150 women and youth groups in production, repair and sale of energy saving equipment
To train schools and communities on energy conservation and use of renewable energy technologies.
To develop an energy equipment workshop for production, service and sale of improved cook stoves and energy saving equipment.

1.3 ACTIVITIES
The activities in the project will be
Community mobilization on energy conservation, forest resource management and effect of indoor air
Training in design, manufacturers and sale of renewable energy equipment and technologies i.e. biogas, TLUD gasifier cookstoves.
Networking on renewable energy conservation i.e. knowledge sharing and information dissemination.
Manufacture TLUD gasifier cookstoves, and five Biogas planters

2.0 STATEMENT OF COMPLIANCE WITH PARTNERS
This project will be carried out within the Nile Basin in Western Kenya. The same area is sources of Nile and other small tributaries. The project will promote energy saving culture and lead to sustainable use of forest resources while contributing towards the Kyoto protocol implementation. While noting that firewood is the major source of energy within the Nile basin and Methane, is 20 times more potent CO2 and hence its use in biogas energy is encouraged in managing green house effect.

3.0 PROJECT AREA
Western Kenya has a population of over 5 million people of which 80% depend on agriculture for livelihood and over 70% use firewood as fuel source. A survey has shown that all boarding schools use firewood and charcoal as fuel for cooking hence pressure on forest cover. Sugar cane growing in Mumias, Malava and Bungoma is a heavy user of trees as firewood. This combined has led to heavy exploitation of forests and trees for firewood hence a danger to the water catchments area.

4.0 PROBLEMS/CHALLENGE
Sugar cane cultivation in western Kenya, which started in mid 1970’s, has accelerated the rate of destruction of trees due to high population density has further compounded the problem of destruction of forests and trees hence threatening the very source of water within the Nile Basin. Schools continue to put pressure on forest due to their high demand for firewood to use in cooking with highly inefficient open fire stoves. These project will develop biogas as an alternative source of energy, promote economical use of energy in institutions and homesteads through use of energy saving stoves create employment for people trained in production and service of the same and of the same and efficiently generate and use the highly potent methane from farmlands through biogas plants.

5.0 RATIONALE
This project meets the requirements of MDG's and Partnership for clean indoor air broad objective. The project will support community driven effort and will address environmental threats on local scale within the Nile basin region in the area of development and use of alternative energy and construction materials. In the process of carrying out participatory planning and appraisals for Musamba, Matungu, Kholera and Khalaba, the villagers expressed the desire to get cheap alternative to fuel firewood energy and alternative to open fire 3-stone cooking method. In all this areas, villagers expressed their fears that trees are disappearing and as a result they use farm wastes like maize stalks for firewood. The same should be used to replenish soil fertility after the crop season and should not used in the kitchen as firewood. Others were resorting to cane trash and remnants.

See specific goals and objectives in the attached project document.

AFCONAFCON

Paal Wendelo has created a pdf of his powerpoint presentation illustrating the comparative wastefulness of traditionally made charcoal compared with his TLUD stove.

Jordan Ανδρικά • Summer SALE έως -50%

Stove and 1 HP Pelletizer
Brendon Mendonca, Watershed Organisation Trust April 25, 2009

WOTR StoveWOTR Stove
Pictures of the stove (4000 sold) and 1 HP pelletizer.

Following is the link to our website http://www.wotr.org/renewable_energy.html

WOTR FLAMEWOTR FLAME
WOTR 1 HP Pellet MillWOTR 1 HP Pellet Mill

Brendon mendonca.brendon@gmail.com

Pages

Subscribe to Gasifier (microgasification)