This is a three-part brief description of the World Stove Everything Nice stove made by Al Hislop and Patty Roberts, with Ron Larson participating in the first tests, January, 2010.
 World Everything Nice Stove
Plans Available at: http://worldstove.com/wp-content/uploads/2009/11/EverythingNice_Stove_Instructions.pdf
Part A. Narrative (by Patty)
Biochar Experiment 1 1/9/10
Al made an Everything Nice pyrolyzer from the design on the World Stove website. We used a large coffee can and then a canister for the two cans so it was rather large. We first tried pine cones but they just smoked so we put in pellets instead. This gave a good clean burn and we put a tripod over the stove and boiled water, heated soup, cooked pasta and cooked pasta sauce with fresh meat and fresh vegetables. When the flame extinguished, there was still some smoke coming from the stove so it was covered on the top to remove oxygen and set in a shallow basin of water on the bottom. This extinguished the smoke but moistened the bottom of the char slightly. When we emptied the stove, we saw that some of the pellets had not pyrolyzed. We believe this was because of the fairly large diameter of the can. To dry the char and pyrolyze the remaining pellets, we put the mass into a canister and put it into our hot wood stove. This allowed complete pyrolysis of the remaining pellets and provided complete drying of the fuel. It’s possible that this changed the pH of the char from its original pH because of a different pyrolysis temperature.
Ignition: torch (for several minutes)
Pre-burn Fuel Weight: 58.5 oz wood pellets from 100% pine, less than 1% ash
Post-burn Fuel Weight (Char): 16.5 oz (28.2% of starting weight)
Post-burn Fuel Volume: Slightly greater than half of pre-burn volume
Time: 2 hours and 20 minutes of a very good, clean, strong burn.
Calculated output to pot: 560 watts
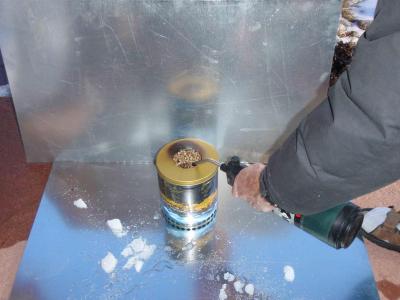
Exp1: (Saturday)
_*Lighting:*_ See text. Hope others can tell us of their successful
ways to light this same stove. We have not yet tried to solve this
problem using prepared starter materials. Maybe easier with the
"restriction-lid" removed? The two sheet metal wind-breaks and the ice
show this was not the best day for testing. Note the small amount of
discoloration (burned paint on the lid) - from an earlier test with
too-loose material (that was easier to light), which only gets a little
larger in later photos.. Discoloration off-centered because of windy
conditions and means of lighting. When we got it started with this
torch, there was never any massive smoking.
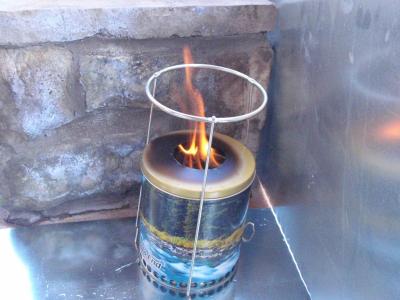
*_Good flame_*. A typical flame without a cook-pot. We saw essentially
the same flame for a total of more than 4 hours over two experiments.
The gap-reducing bricks not in place in this early photo. The
discoloration of the lid never got much more pronounced than here -
showing that a relatively cool gas is coming up in the outer narrow
"chimney". You can't see it here - but there are hot gases going down
through the central can fuel supply - doing the pyrolysis without
oxygen. We are unsure whether any pyrolysis gas is coming upwards
(we don't understand the pressure profiles yet), but certainly a good bit
is going downward. This is the best view of the outer set of large
holes. Could they be done with a punch? Maybe. Could they be
placed on the bottom of the outer can? Maybe - with a spacer
between the bottom surfaces of the two “cans” (as is done in the
mainWorld Stove models). There are several ways
possible to control this air supply - which should NOT be called the
primary air, as would be appropriate if this were a TLUD. Although
there is some pre-mixing of the combustion gases, this still is showing
signs of being a ("wispy") diffusion flame - not at all like the tighter
much bluer flame seen in Nathaniel's numerous YouTube videos and
mentioned in the instructions.
 Experiment 1, Cooking
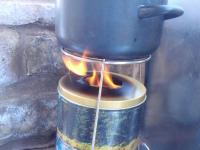
*_Cooking_*: Typical flame with a typical pot (and larger ones used for
some of the cooking). The tripod was in no way optimized (we raised
the stove about three inches with standard available mini-bricks; four
inches might have given higher efficiency - but more soot). It was
certainly easy to have too much heat for cooking pasta (boil-over once
when we weren't paying attention). At no time during the two hours of
operation did we (or could we) adjust anything. We are working on a
possible fix for that, when on a later weekend, we will try a means of
controlling the air flow. You should also next see a "convection skirt"
of the type being sold by Aprovecho.
Biochar Experiment 2 1/10/10
Using the same stove as yesterday, but this time with a cone in the center to displace the area that didn’t pyrolyze yesterday, we filled the stove with pellets again. This time however the stove had 15% less fuel because of the cone. We spent about a half hour trying to light the stove with twigs, vasoline, pine needles, paper, some other fluffy combustibles and fondue fuel. None of these things got the stove going. We ended up using the torch again. The torch lit the pellets in a minute or so and then it took about 15 minutes before we saw the good, steady, smokeless cooking flame. Once we got that good flame, we measured 2 hours 23 minutes of pyrolysis. The stove burned for the about the same amount of time as yesterday, but this time all the pellets were pyrolyzed. The outer can seemed to have the same temperature pattern today as yesterday.
Ignition: torch (shorter time than yesterday)
Pre-burn Fuel Weight: 49.5 oz wood pellets (same kind as yesterday)
Post-burn Fuel Weight (Char): 14 oz (28.2 % of starting weight, same as yesterday)
Post-burn volume: a little less than half
Calculated output to pot: 287 watts (This number is much lower than yesterday’s. We don’t like our thermometer for this application, so both days’ numbers are suspect.)
Time: 2 hours 23 (more carefully measured than yesterday)
Those temperatures were pretty consistent until the pyrolysis ended and we put a cap on the top. Unlike yesterday, we didn’t put the bottom in water. Smoke began to come out of the holes at the bottom and the temperature at the bottom began to rise. We suspected that some combustion was starting to take place. We poured the pellets into a tray but they seemed to be getting hotter rather than cooler so we scooped them into another canister and put on a tight lid so no more oxygen would be available.
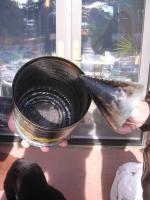
_*Cone*_ - Showing the cone and the interior (the latter after almost
five hours of operation). No signs of any excess heat anywhere on the
outside can. Little on the inner can, but considerable tarring on the
inside and the top portion of the cone. Probably a lot of interesting
pyrolysis science in understanding why the cone looks like it does after
2+ hours of operation one time. Note the many interior small holes.
Note the single screw holding the two cans together (not shown in Nathaniel's drawings [at http://worldstove.com/wp-content/uploads/2009/11/EverythingNice_Stove_In...
] but mentioned at the bottom of p 3. We found all the instructions
complete, but guess we have to test a lot more fuel combinations before
we get the tight blue flame mentioned in the instructions.
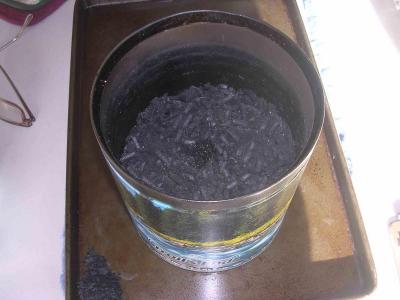 Experiment 2, After Pyrolysis
Exp 2 (Sunday)
*_After Pyrolisis_* A view into the unit perhaps ten-fifteen minutes after the
unit stopped operating - and began smoking (pretty profusely, so you
want to react quickly). We placed a second lid to cover the opening -
but nothing else.(no covering of the lower holes - which we would likely
try to do next time). Note good uniformity of the char except right in
the middle where you can see the tip of the added cone. This is the first
time you can see that there are two cans - with the spacing of about a
centimeter (exact spacing dictated by can availability; this outer can is available at
about $.50-$1.00; no cost for the inner can). At the lower left is the
(pre-trimmed) pine cone which charred perfectly after being placed into
the unit.. No lighting up, no combustion, perfect retention of tiny
features - proving the lack of oxygen just below the flames seen in
other pictures. The unit was initially filled up to within 3/4 inch of
the top of the inner can, per Nathaniel's instructions, so you can see
there was perhaps 35-40% shrinkage.
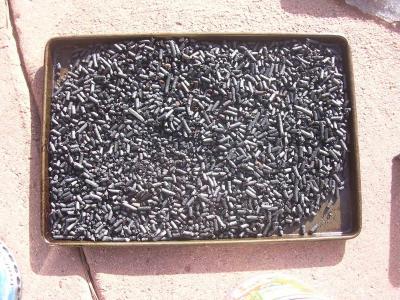 Experiment 2, Char
_*Exp 2 Char:*_ This to show the good uniformity of the resulting
char. Just a few that looked torrified (deep brown color - but we
can't even see them in this photo), not charred. In Experiment #1,
with no interior cone, perhaps 15% uncharred, roughly in the volume
taken up by the cone.
New plans and new ideas: We want a sliding band around the bottom of the can which can be used to regulate airflow through the holes and maybe the pyrolysis rate. When the band slides down, it will partially close the holes. When pyrolisis has finished, the band can be pushed all the way down to cover the holes entirely and keep oxygen out.
Part B. Technical Description
(by Al)
The inner tin was a Yuban Coffee can, with diameter 6.05 inches (excluding the roll bead where the bottom is attached. The original height of the can was 7.5 inches, and the height was trimmed down to 6.7 inches above the inside of the bottom surface. 74 holes .0.159 inch diameter were drilled on a line 0.75 inches from the bottom.
The outer tin was a decorative cookie tin with a fitted lid. The diameter of the can (excluding the rolled bead that attached the bottom) was 6.4 inches. A 3 inch diameter hole was cut in the center of the lid. The lid was 7.1 inches above the inside of the bottom of the can. 33 holes of 0.5 inch diameter were drilled as close as possible to the bottom of the outer can.
The inner can was filled to about ¾ inch of its top with pine pellets intended for use with pellet stoves. The weight of the fuel was 58.5 oz (1.66 kg). These pellets were ignited using a propane torch over the entire top surface for about 1 minute.
The stove operated with what appeared to be constant output for 140 minutes. A water heating test was performed with a pot set about 3 inches above the stove opening. Two liters of water was placed in a covered pot of diameter 8.5 inches and height (without lid) of 3 inches. Water temperature was measured using a “point-and-shoot” infrared thermometer. (I suspect that at higher temperatures this thermometer reads low, as it most likely senses the temperature of the steam above the water in the pot, and not the water itself.) Water start temperature was 12.5C, and finish temperature was 81.1C, at which time boiling bubbles were coming off the bottom of the pot, and much energy was being lost to steam. Elapsed time was 17 minutes.
When the flame extinguished, much smoke came from the stove, so a lid without a hole was placed on top of the stove. Smoke continued to pour from the holes at the bottom of the stove, so it was placed in a pan of water to cover the holes. This resulted in wetting of the contents of the stove. After cooling, the stove was opened and the contents examined. The fuel was found to have been converted to char, except for a portion of pellets about 1.5 inches high and 3 inches in diameter at the bottom of the stove.
Since the fuel was wet, it was not weighed. Instead, the wet fuel including the unconverted pellets was placed in a container and heated to complete pyrolization. The weight of the remaining char was 16.5 oz (28.2% original weight).
A hollow metal cone of height 4.5 inches and diameter 4.5 inches was made, and placed in the bottom of the inner can before adding fuel pellets for a second run. This time the weight of the fuel was 49.5 oz, the burn time was again 140 minutes, and the weight of the remaining char was 14 oz (28.3% original weight). This time all but 1 or 2 pellets appeared to have been converted to char.
