Ceramic Charcoal Making Cookstove
Ron Larson and Richard Boyt, June 2003
Stovers: Richard Boyt and I are having a discussion on making charcoal-making stoves out of clay. Richard has sent me a new paper design below. This note is only on my own progress - which Richard has been kind enough to continue.
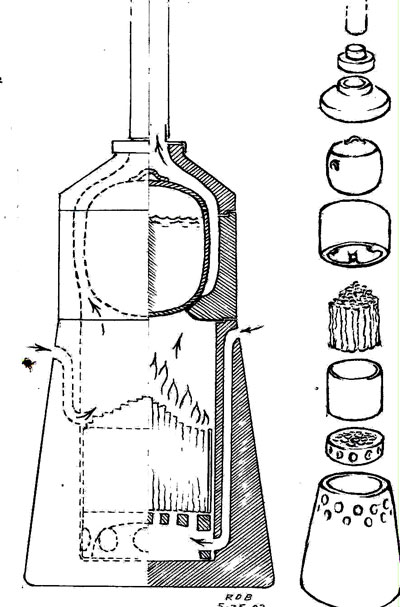 |
| Initial Design Concepts:
1. Wide bottom for stability
2. Main body, grate, skirt, lid, cast lightweight ceramic.
3. Preheat and control primary and secondary air.
4. Remove pot, skirt, skirt top, chimney adapter, chimney for grilling, frying roast, etc.
5. Fuel holder, chimney and adapter metal(?)
|
Richard:
The purpose of this post is mainly to describe the new ideas (#3 and 4) I am trying out after the previously mentioned designs in my post of May 25 to you and "Stoves". After this next week, this post will allow me to be more concise on what I have learned from working with clay for natural-draft charcoal-making stoves (which require separate and fairly complete control of both primary and secondary air). The older versions (just out of kiln no testing yet)
#1 - double walled ceramic two "can" affair- each of height about 18.5 cm and ID = 10.5 cm, and
#2 - "hourglass design" - single wall - total height of 37 cm, with smallest"throat" of ID =7.5 cm
New are two of single wall design:
#3 is a thrown single tall cylinder of 24 cm total height and ID = 9.5 cm
#4 is a slab-built a little taller (29 cm) and narrower (8 cm)
Like #1, both of these are "welded" to flat bottom "disks (flat plates - not washers)" of about 19-20 cm diameter to provide better stability.
Still trying for preheating, #3 has a vertical heat collecting "rectangular channel (RC)" (with inner dimensions of about 5 x 20 mm) on the outer portion of the upper combustion chamber" that should allow some preheating of air. This can be bypassed. Then a full ring surrounds all the secondary air inlet holes with dimensions about like the RC. This is supposed to provide a wind shield and some secondary air heating. Maybe 50 small secondary air holes of diameter maybe 2mm - these all punched with small "drill". I have found it much easier to punch these through clay than through metal.
At the bottom the primary air holes are maybe 8 mm across and maybe 15-20 of them. I created a wind shield for these bottom holes by using a thin "slanted washer" that is also supposed to provide a total air seal and structural support between the vertical wall and the bottom stability disk. I found this somewhat difficult to do at first - but think a good potter could do the whole thing in well less than an hour (the "slanted washer" in 5-10 minutes).
#4 (two initially 1/4" thick (6mm) tall flat slab pieces) is somewhat similar - but here I tried to put the heat collecting vertical section inside rather than outside. I created the (now) roughly triangular down draft portion with one thinner "strip" that I "welded" in place (in #2, I needed three separate pieces to create the air preheat "column"). I continued the "inner welded strip" down through the fuel (pyrolyzing) section the same way, but with these two air supply sections separated from each other by a small barrier. The "diameter" of this sort of triangular cross section "hollow column" is about 25 mm. There are upper and lower outer holes for plugging or partial plugging for both the primary and secondary air regions.
I welded small "handles" on all but #2 hourglass (had gotten too dry by time I remembered). I fired first at cone 06 and later at cone 9 - after adding a bit of glaze at places where cracks had appeared or I thought might appear. The only bad cracks appeared in #1 (double wall slab) and I think will be tough to avoid. The glaze did mostly a good job of filling these, but I do have some leakage - but I don't think is in places which will much influence performance. I am guessing form this experience that we may decide that a double wall is too tough to implement in clay - and that the outer "wall" can be made out of light gauge metal. Out of all the 5 pieces making up these four stoves, I only ended up with one obvious small crack at the bottom of one - and this was my fault for not being more careful in a patch.
Observations from a "potting perspective" so far:
I think the overall primary and secondary air-control capability from working with clay is very good. I believe I have gotten a reasonable approximation to commercial construction techniques when working with these pyrolyzing-type stoves. Whether it can stand up to regular use for very long times remains to be seen. I am still not happy with what I have - but the next week should allow me to learn a good bit more about the ease of use of different types - as I now can check:
single (2,3,4) vs. double walls (#1),
shielded (1,3,4) vs. unshielded (#2),
stackable (#1) vs. unipiece (# 2,3,4);
secondary air pre-heat vs. not (most all cases),
ability to "hang" metal both inside and outside or none (for all cases, I
think).
broad conical base (#2) vs. large flat bottom plate
I am worried I may not:
a). have allowed for enough air flow (paths seemed to have shrunk more than I thought - and I can't change them now)
b). have done a good enough job with the bottom grates, but think that will be easy to fix in later models. The clay was still too wet when I was working most of the grates into place. I need to do a better job on measuring before barging ahead - as I could do with simpler geometries.
One of these four ought to work like the metal ones you and I have tested.
So this is to ask you for any further comments based on this again crude description.
Ron Larson
ronallarson@QWEST.NET
June 1, 2003
Dick Boyt
rdboyt@yahoo.com
20479 Panda Rd
Neosho, MO 64850
Note: See other articles by Richard Boyt